


So you want to create iPhone apps, huh? Maybe you’ve got the next trending idea forming, or maybe you just want to place a button on a screen and make it perform something. Either way, welcome to Xcode — Apple’s not-so-hidden tool for turning caffeine into real apps.
TL;DR — The Fast Track:
- Download Xcode from the Mac App Store (it’s free, but you’ll need a Mac and around 40GB of storage)
- Create your first project using the iOS App template
- Run it in the Simulator and watch your “Hello World” come alive without purchasing a single iPhone
This guide is for total beginners, students who mistakenly enrolled in an iOS dev class, and curious developers who want to explore Apple’s ecosystem without getting stuck in confusion.
What is Xcode?
Consider Xcode to be your all-purpose tool for developing anything that runs on Apple devices. It’s Apple’s official integrated development environment (IDE) — simple words for “the app where you write code and build apps.”
You can make apps with Xcode for:
- iOS devices (iPhone and iPad)
- macOS (for Macs)
- watchOS (Apple Watches)
- tvOS (Apple TVs)
Xcode does, however, serve as more than simply a sophisticated text editor; in addition, Xcode comes with a variety of resources and tools intended to facilitate the development process, including: Interface Builder (allowing developers to design user interfaces through the graphical interface rather than by typing code), Simulator (allowing developers to test apps on simulated mobile device hardware rather than purchasing a whole bunch of iPhone devices), debugging tools (which help developers trace errors similar to how detectives find criminals), and Swift Playgrounds (allowing developers to test individual pieces of code without constructing a complete project).
Why Use Xcode? (And When You Shouldn’t)
The Good Stuff
If you are developing software for Apple’s ecosystem, your only option is Xcode. Apple’s development environment, Xcode, integrates flawlessly with the latest iOS features as they become available. SwiftUI? Covered. Metal graphics? Included. That strange new widget Apple announced yesterday? Probably already there.
Who Should Learn Xcode:
- Mobile developers aiming to build iOS or macOS apps
- UI/UX designers who want to prototype interactive layouts
- Game developers using Unity or native frameworks (Xcode works with game engines)
- Anyone interested in app development who owns a Mac
Real Talk: Learning Xcode opens opportunities. The App Store has over 1.8 million apps, and every single one was built (or at least compiled) using Xcode. That’s a solid group to be part of.
When to Look Elsewhere
Xcode is excellent for Apple-related work, but it’s too heavy (and honestly not great) for other tasks. If you’re building cross-platform apps for Android and iOS, tools like Flutter or React Native may suit you better. Writing Python scripts? Xcode can technically do it, but VS Code or PyCharm will make life easier. Building web apps? Just… don’t. Use a proper web development setup.
Installing & Setting Up Xcode (Step-by-Step)

Alright, let’s get things moving.
Check System Requirements & Mac Compatibility
First things first: you need a Mac. Not ideal news if you’re on Windows or Linux, but Xcode only works on macOS. No virtual machines, no magic tricks that work properly. Just Mac.
What You Need:
- macOS Monterey (12.0) or later (newer versions are better)
- At least 40GB of free storage (Xcode is large)
- 8GB RAM minimum (16GB if you want peace of mind)
- A reasonably modern Mac (2017 or newer should be fine.
Download from App Store & First Launch
- Open the Mac App Store (that colorful “A” icon in your dock)
- Search for “Xcode”
- Click “Get” or the download cloud icon
- Go make a sandwich. Or two. The download is huge (12–15GB), and installation takes another 20+ minutes.
Once Xcode finishes installing, open it. You’ll see a welcome screen with options like “Create a new Xcode project” and “Clone an existing project.” Relax — we’ll go through it.
Preferences Quick Setup
Before jumping in, adjust a few settings:
- Go to Xcode → Settings (or press Cmd + ,)
- Click the Locations tab
- Ensure “Command Line Tools” is set to your current Xcode version
- Under Components, you can download extra simulators for different iOS versions or devices
My Tip: Download at least one iOS simulator during setup. Typically, Xcode installs the most current iPhone simulator by default; however, you may also install older iOS device types (i.e., iPads) or other Apple product simulators (i.e., Apple Watches) at your own risk.
Xcode Interface Overview (Don’t Get Lost in the Sauce)
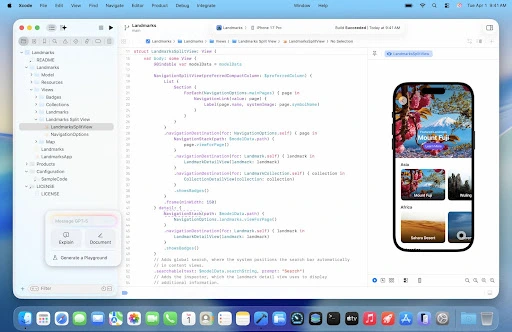
As soon as you launch Xcode and initiate a new project, you may see quite a few panel areas. To help you better understand what you’re seeing, we’ll provide a brief overview:
Navigator Area (Left Side)
This is your project’s file browser. You’ll see folders for Swift files, images, storyboards, and other resources. Think of it as Finder, but made for your app’s internal files.
Editor Area (Middle — The Big One)
This is where the real work happens. Code lives here. When you open a Swift file, you write logic in this area. Open a storyboard or SwiftUI preview, and you design your interface here instead.
Inspector Area (Right Side)
This shows details about whatever you select. Click a button in Interface Builder? The Inspector displays its properties (text, color, constraints). Select a file? You’ll see its metadata. It changes based on context.
Debug Area (Bottom)
When your app runs, this is where you’ll see print logs, error messages, and runtime information. If your app crashes, this is where you’ll troubleshoot (and sigh).
Interface Builder / SwiftUI Canvas
These are visual design tools. Interface Builder uses Storyboards for drag-and-drop UI creation. SwiftUI Canvas shows live previews of your SwiftUI code as you type. Both are far better than writing UI code from scratch, like it’s 1999.
Your First App in Xcode — Step-by-Step
Enough explanation. Let’s build something.
Create a New Project
- Launch Xcode
- Click “Create a new Xcode project” (or go to File → New → Project)
- Under iOS, select “App” and click Next
- Fill in the details:
- Product Name: HelloWorld (or any name you prefer)
- Team: Leave as “None” for now
- Organization Identifier: Use something like com.yourname
- Interface: SwiftUI
- Language: Swift
- Choose a save location and click Create
That’s it. You’ve created an Xcode project.
Understand the Files You Just Created
Xcode automatically generates several files. The important ones are:
- HelloWorldApp.swift: The app’s entry point
- ContentView.swift: Your main screen’s code
- Assets.xcassets: Where images, icons, and colors live
- Preview Content: Assets used only for SwiftUI previews
Add a Label & Button
Open ContentView.swift. You’ll see code similar to this:
struct ContentView: View {
var body: some View {
Text(“Hello, world!”)
.padding()
}
}
This creates a simple text label. Let’s improve it.
Replace it with:
struct ContentView: View {
@State private var greeting = “Hello, world!”
var body: some View {
VStack {
Text(greeting)
.font(.largeTitle)
.padding()
Button(“Change Greeting”) {
greeting = “You clicked the button!”
}
.padding()
.background(Color.blue)
.foregroundColor(.white)
.cornerRadius(10)
}
}
}
What’s Happening Here:
- @State creates a variable that updates the UI
- VStack arranges elements vertically
- The Button updates the greeting text when tapped
Run in Simulator
Now the fun part.
- Look at the top-left toolbar in Xcode
- Click the device dropdown
- Select any iPhone simulator
- Click the Play button (or press Cmd + R)
Xcode compiles your code and opens the Simulator. After a few seconds, your app appears. Click the button and watch the text change. Congrats — you’ve built your first iOS app.
Ayaz Tip: The first build takes time. Later builds are much faster thanks to caching.
Xcode for Python? (Let’s Clear This Up)
This question comes up often: “Can I use Xcode for Python?”
Short answer: Not really.
Does Xcode Support Python?
Xcode is built for Swift, Objective-C, C, and C++. Python isn’t a priority here. You can write Python files, but you won’t get proper debugging, autocomplete, or project support.
Workarounds (Not Worth It)
Some developers force Python into Xcode using custom scripts, but it’s messy and frustrating. You’ll spend more time fixing tools than writing code.
What You Should Use Instead
For Python on Mac, use:
- VS Code
- PyCharm
- Sublime Text or Atom
Keep Xcode for Apple app development.
Key Xcode Features Beginners Should Know
Simulator — Your Virtual Device Collection
The Simulator allows you to test apps on virtual iPhones, iPads, and Apple Watches without purchasing physical devices.
Debugging Basics
Your app will crash at some point. Xcode’s debugger helps you find out why.
Version Control (Git) Integration
Xcode includes built-in Git support so you can track changes and manage versions without leaving the app.
Templates & SDKs
Xcode templates give you starter code. The iOS SDK includes powerful frameworks like SwiftUI and UIKit.
Common Errors Beginners Face & How to Fix Them
Signing Errors
Add your Apple ID in Signing & Capabilities.
Build Failed Errors
Check typos, clean the build folder, and read error messages carefully.
Simulator Issues
Restart the Simulator or delete and recreate it if needed.
Next Steps After Your First App
Learn Swift, build small projects, explore SwiftUI, and join the iOS community. Practice is the key.
Conclusion: You’ve Got This
Learning Xcode takes time. You’ll face errors and frustration. But every successful iOS developer started exactly where you are now. Keep going, keep building, and don’t give up.
Welcome to iOS development. You’re going to create something great.
FAQs
Is Xcode completely free to use?
Can Xcode run on Windows or Linux?
Xcode is a macOS-exclusive, dancing only on Apple’s stage. Windows and Linux users? They might face a virtual roadblock in their quest.
Do I need to know Swift before using Xcode?
No need for Swift mastery to dive into Xcode. Beginners can easily learn Swift and Xcode together with fun online tutorials.
Can I build iOS apps without an iPhone?
Absolutely! Xcode's Simulator lets you craft and test iOS apps, no iPhone needed.
How Long Does It Take to Master Xcode?
Unlock the basics of Xcode in just 1 to 2 weeks. With practice, you'll craft simple apps in a month. Gradually, advanced skills will bloom through steady learning and engaging real projects.


