


Nobody thinks about their desk setup until something hurts.
That is just how it goes. You grab whatever chair is available, put the laptop on the table, and get to work. Months pass. Then one morning you wake up, and your neck is stiff, your lower back aches, and your wrists feel off. You start wondering what changed.
Nothing changed. That is the problem. You have been sitting the same wrong way for months, and the bill finally came due.
I put this guide together for people who work long hours at a desk and want to actually fix their setup properly. Not buy expensive stuff. Do not follow vague tips. Actually fix it, based on real research from OSHA and NIOSH, step by step.
What Does Ergonomic Even Mean?
The word comes from Greek. Ergon means work. Nomos means laws. The science of designing a workspace to fit the human using it, rather than expecting the human to fit the workspace awkwardly.
To put it simply, the way your chair, desk, monitor, keyboard, and mouse are set up should mean your body feels comfortable and natural as you work. No hunching forward. No twisting your wrists at odd angles. No tilting your head down for eight hours straight.
Here is what most people get wrong about this. They think ergonomics means sitting up perfectly straight and holding it all day. That is not it. Holding any position rigidly for hours will tire you out and hurt you, even a technically correct one. What you actually want is a setup that supports your body so well that you stop thinking about your posture entirely. It just happens on its own.
Why Working From Home Makes This Worse
In a traditional office, someone usually handles workstation setup. There are guidelines posted somewhere. HR occasionally walks around and checks. At home, none of that exists.
Nobody tells you your dining chair is slowly wrecking your lumbar spine. Nobody notices that your laptop screen sits four inches below eye level and your neck is quietly suffering every single day. You find out the hard way, usually after several months of waking up sore or finishing the workday with a headache that just will not leave.
OSHA data puts musculoskeletal disorders at roughly 33 percent of all worker injury and illness cases. Remote workers face a higher risk than office workers simply because nobody assessed their workstations.
There is another side to this that people do not talk about enough. Physical discomfort is a quiet tax on your focus. Any pain, even minor, takes up a portion of your brain all day long. You don’t realize this until you fix the problem, and you feel so much sharper and less drained when you do.
Remote workers managing their own workspace without corporate oversight need systems for everything—including workspace health. Our virtual assistant guide doubles as a remote work infrastructure blueprint, covering not just ergonomics but also time management and workspace organization for home-based professionals.
What Happens to Your Body When the Setup Is Wrong
These are not rare or dramatic outcomes. These are the regular complaints from desk workers who sit in poorly arranged setups for too long:
- Lower back pain that becomes a daily thing rather than an occasional one
- Neck and shoulder tension that builds up from looking down at a low monitor all day
- Wrist pain and early carpal tunnel symptoms from keyboard angles that are slightly wrong every single day
- Headaches and dry, tired eyes from screen glare or wrong viewing distance
- Tight hips and sluggish legs from sitting for hours without real breaks
- RSI, which stands for Repetitive Strain Injury, is caused by small repeated movements in positions the body was not designed to hold long-term
The Basics You Need to Understand First
What Neutral Posture Actually Looks Like
A neutral posture is not a military stance. Your body naturally settles into that relaxed position whenever you’re properly supported. Flexible. Standing straight. Sit comfortably without any strain on your body.
For a seated individual, a neutral posture appears as follows.
- Your ears should go straight up from the shoulders.
- Make sure your shoulders are relaxed and dropped, not pulled up toward your ears.
- Keep your elbows bent at about 90 degrees and close to your sides.
- Keep your wrists flat and level while typing; do not bend them upwards or curl them down.
- Hips should be at or slightly above knee height.
- Both feet are resting flat on the floor
- Lower back holding its natural inward curve, supported rather than collapsed flat
When your body sits this way without effort, your muscles do much less work just to keep you upright. That saved energy goes toward your actual job. That is the whole point.
The 90-90-90 Rule
This is a quick check for physiotherapists and ergonomics professionals. It’s a basic idea. When seated at your desk, each of the three joints should rest at roughly a 90-degree angle.
- Keep your ankles at a 90-degree angle while keeping your feet flat on the ground
- Your thighs must be parallel to the ground, knees at 90 degrees.
- Bend your elbows at 90 degrees, forearms roughly level with your desk.
Do not treat this as a rule to retain forever; think of it as your starting point. It’s fine and even beneficial for you to shift around. What’s important is that after you’ve moved, you get back close to this position.
What Sitting for Hours Actually Does to You
The problem is not sitting. The problem is sitting without stopping for hours on end.
Around the 30 to 45 minute mark, blood flow to your legs starts to slow down. Your hip flexors begin to tighten. The deep muscles in your core quietly switch off because they are not being asked to do anything. Your lumbar spine absorbs more load than it was designed to carry over extended periods.
Researchers at Cornell found that the healthiest work pattern involves sitting for 20 to 30 minutes, standing for 8 to 10, and taking short movement breaks every hour. A good setup makes that easy. A bad setup makes it impossible to even think about it because you are just trying to stay comfortable.
How to Actually Set Up Your Home Office
 Go through each section below and make the adjustments as you read. Come back and revisit things a few weeks later because your body will keep adapting, and you may need to fine-tune.
Desk Height
Finding the Right Height for You
Standard desks sit at 73 to 75 centimeters tall. That measurement was designed around an average height man from decades ago, and it simply does not suit most people sitting at it today.
A rough starting point by height:
- Under 5 feet 4 inches: aim for a desk height of 68 to 70 cm
- 5 feet 4 to 5 feet 8: 70 to 73 cm is your range
- 5 foot 8 to 6 foot: 73 to 76 cm
- Over 6 feet: 76 to 80 cm works well
A faster way to check without measuring anything. Sit down and let your shoulders completely relax. Bend your elbows to 90 degrees. Your hands should land right at desk surface level without you having to raise or lower your arms to get there. If they do not, the desk height is wrong for you.
Precise Desk Height Calculator
Use this table for exact measurements based on your height:
| Your Height | Sitting Desk Height | Standing Desk Height | Monitor Height from Desk |
| 5’0″ (152cm) | 62-66cm (24-26″) | 94-99cm (37-39″) | 12-15cm (5-6″) |
| 5’2″ (157cm) | 64-68cm (25-27″) | 97-102cm (38-40″) | 12-15cm (5-6″) |
| 5’4″ (163cm) | 66-70cm (26-28″) | 99-104cm (39-41″) | 13-16cm (5-6″) |
| 5’6″ (168cm) | 68-72cm (27-28″) | 102-107cm (40-42″) | 13-17cm (5-7″) |
| 5’8″ (173cm) | 70-74cm (28-29″) | 104-109cm (41-43″) | 14-17cm (6-7″) |
| 5’10” (178cm) | 72-76cm (28-30″) | 107-112cm (42-44″) | 14-18cm (6-7″) |
| 6’0″ (183cm) | 74-78cm (29-31″) | 109-114cm (43-45″) | 15-18cm (6-7″) |
| 6’2″ (188cm) | 76-80cm (30-31″) | 112-117cm (44-46″) | 15-19cm (6-7″) |
| 6’4″ (193cm) | 78-82cm (31-32″) | 114-119cm (45-47″) | 16-19cm (6-8″) |
Note: These are starting points. Fine-tune based on your torso-to-leg ratio and personal comfort.
Sitting Desk vs Standing Desk
According to the manufacturer, a height-adjustable desk is worth it or not. Having the ability to alternate between sitting and standing during the day is very helpful. However, standing at a desk comes with its own rules, which people often ignore.
When you switch to the standing position:
- Adjust the desk height until elbows remain comfortably positioned at around 90 to 100 degrees.
- At the same time, move your monitor up so your neck stays in a neutral position.
- Put an anti-fatigue mat under your feet, especially if you are on a hard surface floor.
- Limit your standing sessions to approximately 30–45 minutes before sitting back down.
- If you’re going to be standing for any considerable amount of time, wear decent footwear.
Chair Setup
Height, Seat Depth, and Lumbar Support
Your chair is the foundation of everything. Get the chair wrong, and nothing else you adjust will properly fix things.
Seat height: Both feet need to rest flat on the floor. Your thighs should run parallel to the ground. No pressure should cut into the backs of your legs near the front edge of the seat.
The top edge of your monitor should be at or just slightly below your natural eye level. When your head is relaxed and neutral, your eyes will automatically land in the upper third of a computer screen without any head tilt.
Keep the screen at arm’s length away from your face. For most individuals, this distance lies between 50 and 70 cm. Large screens require more distance for viewability. If you find yourself leaning towards the screen to read something, then either pull the monitor closer or increase the text size. It takes around thirty seconds for both fixes.
Armrests
Armrests are either helpful or actively making things worse, depending on how you use them.
The wrong way is dumping the full weight of your arms onto them. That lifts your shoulders and tightens your neck all day without you realizing why.
The right way:
- Set armrests to a height where your shoulders stay relaxed, not raised, not dropped
- Let your elbows rest lightly on the pads without transferring your full arm weight
- Make sure the armrests are not stopping you from getting close enough to your desk
- If they are too wide or too tall and you cannot fix that, just take them off
Monitor Position
Height and Distance From Your Eyes
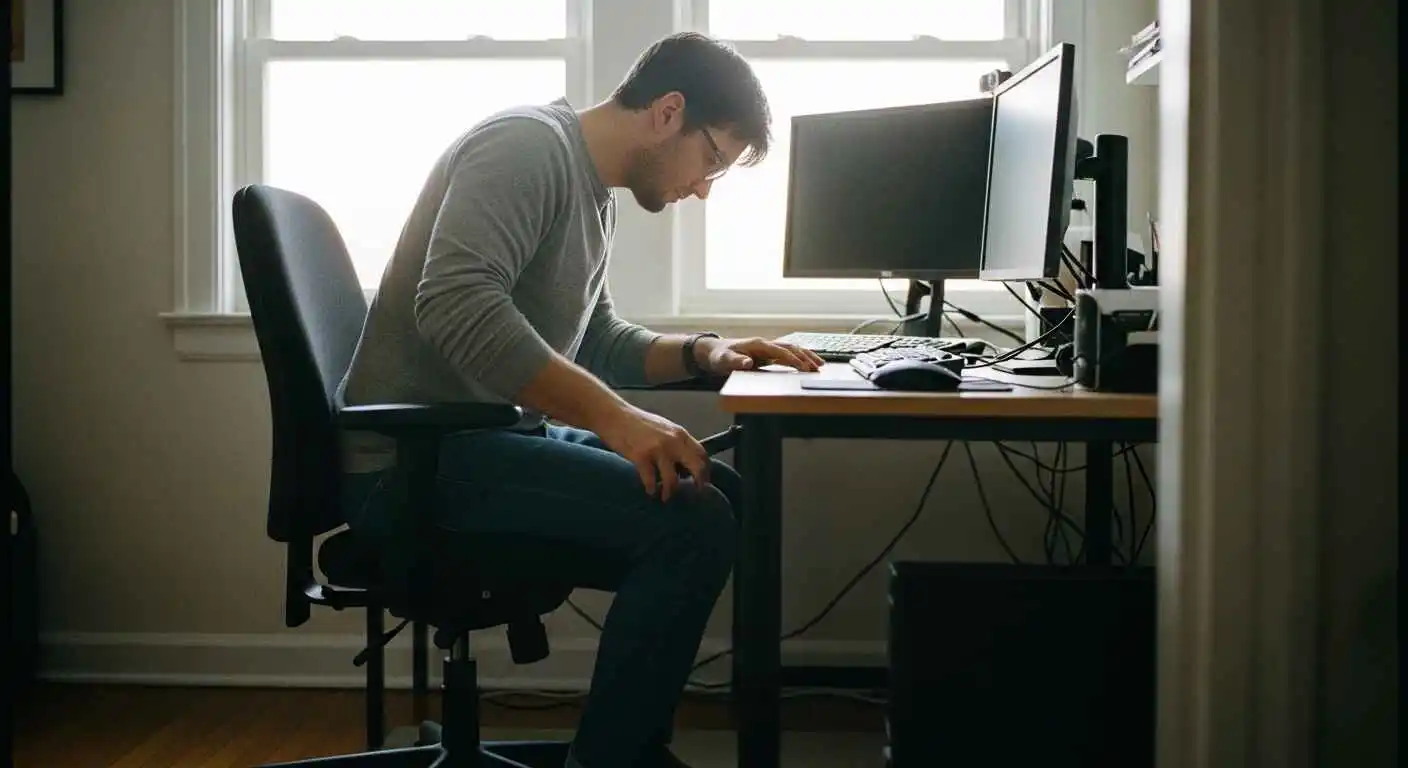
This is where most home setups fail. Monitor too low, head tilts downward all day. Monitor too close, eyes work overtime constantly.
The top edge of your monitor should be at or just slightly below your natural eye level. When your head is relaxed and neutral, your eyes will automatically land in the upper third of a computer screen without any head tilt.
Keep the screen at arm’s length away from your face. For most individuals, this distance lies between 50 and 70 cm. Large screens require more distance for viewability. If you find yourself leaning towards the screen to read something, then either pull the monitor closer or increase the text size. It takes around thirty seconds for both fixes.
Two Monitors
Two screens create a neck rotation problem if you do not set them up carefully.
- If you use one screen more than the other, put the main one directly in front of you and angle the second one to the side at about 30 to 45 degrees
- If you use both equally, sit centered at the join between them and have both screens at the same height and distance
- If looking at either screen makes your head rotate more than roughly 35 degrees, move things around before it becomes a daily strain problem
Laptop Ergonomics
Laptops have a design flaw that cannot be avoided completely. The keyboard and screen are attached to each other. This means that neither of them can occupy the correct position at the same time. If you position the computer screen at a proper height, your keyboard will now be too high. Make sure the keyboard is at the right height, or you will spend the day looking down.
The fix is cheap and straightforward:
- Put the laptop on a stand until the screen reaches eye level
- Plug in a separate keyboard and mouse, so your hands sit at the right height independently
- If you are working from a hotel room or a cafe, at the very least, prop the screen up and sit at a proper table rather than a couch or bed
Keyboard and Mouse
Keeping Your Wrists Straight
Wrist pain and RSI develop from small angles repeated thousands of times daily over many months. The goal is a wrist that stays flat and neutral the whole time you type.
- Position your keyboard at elbow height or just slightly below
- Tilt the keyboard slightly away from you, what ergonomists call negative tilt, so your wrists do not have to angle upward while typing. Most keyboards ship with the wrong tilt by default
- Keep your mouse at the same level as your keyboard and close enough that you are not reaching outward to grab it
- Only rest your wrists on a wrist pad during pauses, not while you are actually typing
Mouse vs Trackpad
Built-in laptop trackpads force your wrist sideways for long periods. That builds up fatigue in the forearm and contributes to strain over time. A proper external mouse at the right height solves most of that. If you prefer a trackpad style of input, a large standalone trackpad placed directly in front of you reduces the awkward sideways wrist angle significantly. Vertical mice are a solid option for anyone whose wrist already bothers them. They keep your hand in a natural handshake position, which removes most of the rotational strain from regular mouse use.
Adjusting for What You Actually Do
 The general setup covers most things. Your specific work changes a few priorities.
Developers and Programmers
Developers type more than almost anyone else at a desk. Hands and wrists are the top priority here.
- A split or tented keyboard cuts down on the inward wrist rotation that regular flat keyboards cause all day
- A big monitor, 27 inches or larger, lets you keep a comfortable reading size without constantly leaning in
- The main coding screen goes directly in front of you. Reference screen or communication apps go to the side
- Dark mode and blue light filtering in the evening reduce the eye fatigue that builds up during late sessions
- Build times and test runs are perfect moments to stand up if you have a height-adjustable desk
Students and Remote Learners
Students usually end up with the worst setups because the expectation just is not there. Dining chairs. Tiny dorm desks. Sometimes the floor is with a laptop balanced on a pillow.
- A laptop stand plus an external keyboard is the best low-cost ergonomic investment available. Usually under 60 dollars total, and it changes everything.
- Roll a bath towel tightly and place it behind your lower back if you have no supportive chair
- Study in 25-minute blocks and stand up briefly between each one
- Lighting behind your screen, not pointed at it, cuts down on the eye strain that stacks up during long reading sessions
Designers and Content Creators
Heavy mouse and tablet work, large monitors, and long, focused creative sessions all create specific demands.
- Drawing tablets belong flat at keyboard height on the desk, not propped up at an angle
- Large color-accurate monitors tend to be heavy, and they often end up sitting too low. Always raise them to proper eye level.
- In a two-screen setup, notice whether you spend most of your time turned toward one side. By the end of the working week, your neck will definitely be sore.
- After a long illustration session or detailed editing work, take 60 seconds to stretch your fingers, hands, and wrists. It sounds like nothing. Over weeks, it actually matters.
Content creators monetizing blogs, YouTube channels, or podcasts spend 8-12 hours daily at desks creating thumbnails, editing videos, and writing scripts. Our blog monetization guide includes a section on sustainable creator workspaces—ergonomics directly impacts content output and creative longevity.
5 Desk Stretches to Do Every 30 Minutes
Physical discomfort builds gradually. These five stretches take 3 minutes total and prevent the most common desk pain when done consistently.
1. Neck Rolls (30 seconds)
How to do it:
- Drop your chin to your chest
- Slowly roll your head in a circle to the right
- Complete 3 circles, then reverse direction
What it fixes: Upper trap tension, neck stiffness from looking at monitors
2. Shoulder Shrugs (30 seconds)
How to do it:
- Raise both shoulders up toward your ears
- Hold for 3 seconds
- Drop them suddenly and completely
- Repeat 5 times
What it fixes: Shoulder tension from keyboard and mouse work
3. Wrist Circles (30 seconds each hand)
How to do it:
- Extend one arm forward
- Make a fist and rotate your wrist in circles
- 10 circles clockwise, 10 counter-clockwise
- Repeat with the other hand
What it fixes: Wrist strain from typing, early carpal tunnel prevention
4. Seated Spinal Twist (30 seconds each side)
How to do it:
- Sit tall in your chair
- Place your right hand on the left armrest
- Rotate your torso to the left
- Hold for 30 seconds, then switch sides
What it fixes: Lower back stiffness, spinal compression from sitting
5. Hip Flexor Stretch (30 seconds each side)
How to do it:
- Stand up, step one foot forward into a lunge position
- Keep the back leg straight, lean forward gently
- Hold for 30 seconds, switch legs
What it fixes: Tight hip flexors from prolonged sitting
Do this routine every 30-45 minutes. Set a timer if needed. Takes 3 minutes total and prevents hours of pain later.
Recommended Products by Budget
 You don’t need to spend thousands to fix your setup. Here’s what actually works at different price points.
Disclaimer: We’re not affiliated with any of these brands. These are commonly recommended products based on ergonomic design. Always test before buying if possible.
Budget: $0-$100
Best starter investments:
Laptop Stand (~$25)
- Amazon Basics Laptop Stand
- Roost Laptop Stand
- Any adjustable stand that raises the screen to eye level
External Keyboard + Mouse (~$40)
- Logitech MK345 Wireless Combo
- Microsoft Bluetooth Desktop
- Any full-size keyboard with a number pad
Lumbar Cushion (~$20-30)
- Everlasting Comfort Memory Foam
- ComfiLife Lumbar Support
- AmazonBasics Mesh Lumbar Support
Monitor Riser (~$20-40)
- Simple wooden or plastic stand
- Adjustable height preferred
- Should lift the screen 4-6 inches
Total for complete budget setup: ~$100-120
Mid-Range: $100-$500
Office Chair ($200-300)
- IKEA Markus (best budget ergonomic chair)
- HON Ignition 2.0
- Staples Hyken Mesh Chair
- Look for: adjustable lumbar support, seat depth adjustment, armrests
Monitor Arm (~$100-150)
- Amazon Basics Single Monitor Arm
- Ergotron LX Desk Mount
- VIVO Single Monitor Stand
- Frees up desk space, perfect height adjustment
Standing Desk Converter (~$150-250)
- Vari Height-Adjustable Desk Riser
- FlexiSpot Standing Desk Converter
- Sits on an existing desk, much cheaper than a full standing desk
Ergonomic Keyboard (~$80-150)
- Microsoft Sculpt Ergonomic Keyboard
- Logitech ERGO K860
- Split design reduces wrist strain
Total for mid-range upgrade: $400-700
Premium: $500+
High-End Ergonomic Chair ($800-1,400)
- Herman Miller Aeron (the gold standard)
- Steelcase Leap V2
- Steelcase Gesture
- Haworth Zody
- Worth it if you sit 8+ hours daily
Full Standing Desk ($400-800)
- Uplift V2
- Fully Jarvis
- ApexDesk Elite
- Motorized, memory presets, stable at all heights
Premium Ergonomic Keyboard ($200-400)
- Kinesis Advantage360
- Ergodox EZ
- ZSA Moonlander
- Extreme split, programmable, learning curve, but worth it
High-End Monitor Arm ($150-300)
- Ergotron LX Dual Side-by-Side
- Humanscale M8.1
- Gas spring adjustment, supports heavy monitors
Anti-Fatigue Mat ($50-100)
- Topo by Ergodriven
- CubeFit TerraMat
- Multiple surface angles encourage movement
Total premium setup: $1,500-3,000+
What to Buy First
If you only have $50: Laptop stand + cheap external keyboard/mouse
If you have $200: Good office chair (IKEA Markus or similar)
If you have $500: Chair ($200) + Monitor arm ($100) + Ergonomic keyboard ($80) + Lumbar cushion ($30)
Buy based on what hurts most: Wrist pain → keyboard first. Back pain → chair first. Neck pain → monitor position first.
Mistakes That Undo Good Ergonomics
Trying to Sit Perfectly Still in Perfect Posture
When people first start paying attention to their posture, they tend to go too far the other way. They sit completely rigid, shoulders back, chin up, back arched, and try to hold it like they are being inspected. That exhausts your muscles quickly. No position stays healthy when you lock into it without any movement at all. You want relaxed and supported, not forced and stiff. If you are consciously working to maintain your posture, your chair is not set up correctly.
Not Actually Getting Up and Moving
A good desk setup does not replace the need for movement. Your body was built for regular, varied motion throughout the day. Not a workout at the gym tonight, but short regular interruptions to sitting. Stand up. Walk to another room. Roll your shoulders a few times. Sit back down. That small cycle repeated throughout the day is exactly what the human body was built for. Skipping it consistently causes problems regardless of how perfect your seated position is.
Buying New Gear Before Fixing What You Have
 A lot of people spend a few hundred dollars on an ergonomic chair and then sit in it at the completely wrong height. They buy a monitor arm and end up positioning the screen in the same place it always was. Gear is useful when it is the right gear and is set up correctly. But adjustments always come first. Spend 20 minutes going through every setting on your current setup before deciding anything needs to be replaced. Most people fix 70 percent of their discomfort for free this way.
Fixes That Cost Nothing or Very Little
Things You Can Sort Out Today
- Stack books, a box, or a couple of reams of printer paper under your monitor until the top of the screen is at eye level
- Use your chair’s height lever until both feet sit flat on the floor
- Roll a bath towel and wedge it at your lower back to support the natural lumbar curve
- Pull your keyboard to the front edge of the desk so your elbows stay close to your body rather than reaching forward
- Open your laptop lid to about 100 to 110 degrees when working flat on a table. It is a small thing, but it helps.
Cheap Accessories That Are Actually Worth It
- Laptop stand, around 20 to 40 dollars: Raises the screen to eye level. Probably the best value ergonomic purchase on this whole list.
- External keyboard and mouse: Your hands and screen can finally be at the right positions independently of each other. Essential for anyone who uses a laptop as their main computer.
- Lumbar cushion, usually under 30 dollars: Fills in the lower back curve support that most chairs completely lack.
- Footrest: Solves the problem for shorter people who cannot lower their desk far enough to keep their feet flat on the floor.
- Monitor riser: Brings a desktop monitor up to the correct height simply and cheaply without needing a full adjustable arm.
- Anti-fatigue mat: Worth having the moment you start standing for more than a few minutes each day.
How Your Desk Setup Affects How Well You Think
Comfort and Focus Are Connected
 Discomfort is a background distraction that runs all day. Your brain picks up on physical discomfort and quietly devotes attention to it, attention that would otherwise go toward your actual work. Research on ergonomic workstations consistently shows better concentration, fewer errors, and higher job satisfaction among workers in properly set up spaces.
For anyone who relies on focused mental work, writers, developers, analysts, and designers, this is a real cost. Every time you shift in your chair because your back aches or pause to stretch your wrist out, you break the thread of whatever you were working through in your head. A well-adjusted setup removes those small interruptions all day long, quietly, in the background.
Screen Fatigue Is a Real Thing
Computer Vision Syndrome affects more than half of regular computer users. The symptoms are ones most desk workers know well: dry eyes, dull, persistent headaches, blurred vision by the afternoon, and a stiff neck at the end of the day. Most people blame screen time. Often, the real culprit is where and how the screen is positioned.
Practical things that actually help:
- Every 20 minutes, look at something at least 20 feet away for 20 seconds. It relaxes the focusing muscles inside your eyes.
- Keep your room lighting at a similar brightness to your screen, so your eyes are not constantly adjusting between dark and bright
- Position your monitor so it sits perpendicular to any windows in the room. That cuts out direct glare at the source.
- Switch on Night Shift on Mac or Night Light on Windows during evening work hours
- A matte screen protector removes surface reflections that cause fatigue, even when you do not consciously register them
For detailed information on preventing eye strain and computer vision syndrome, the American Optometric Association provides comprehensive guidance on healthy screen viewing practices.
A Checklist to Keep Things on Track
At the Start of Each Workday
- Feet flat on the floor
- Lower back touching the lumbar support
- Top of the monitor at eye level
- Screen roughly an arm’s length away
- Keyboard and mouse at elbow height
- Wrists flat and relaxed
- Shoulders sitting low and natural
Once a Week
- Any new tension building in your neck, shoulders, or wrists?
- Has anything drifted from where you originally set it up?
- Are you actually standing up and moving through the day, or just sitting for two hours without noticing?
- Do you squint or lean toward the screen at any point?
- Are you crossing your legs or tucking your feet under the chair out of habit?
Wrapping Up
Your desk setup is not something you figure out once and forget forever. Work habits shift. Your body changes. Things drift over time. The people who stay comfortable long term are the ones who check in every now and then, notice when something feels off, and fix it before it turns into an actual injury.
Start with what you have right now. Raise your monitor. Adjust your chair height. Pull your keyboard closer. Those three things alone will make a real difference for most people, and none of them cost anything.
After that, pay attention to what still bothers you and put your money there specifically. Not toward the most expensive chair in the catalogue, but toward the exact thing your setup is actually missing.
Your body is doing a lot of work every day. The least your workspace can do is get out of the way.
Common Questions
How long before an ergonomic setup actually makes a difference?
Most people feel something within the first week or two. A bit of muscle soreness early on is completely normal because your body is engaging differently than it was before. Give it four weeks, and the new position usually feels completely natural.
Can fixing your desk setup really help with back pain?
Yes, and the research on it is pretty detailed. Proper lumbar support, the right seat height, and regular movement breaks all produce consistent reductions in lower back pain for desk workers. If you have an existing structural issue like a herniated disc, the ergonomic changes still help, but combine them with proper advice from a physio.
Is standing at your desk all day better than sitting?
No. Long periods of standing cause their own problems, including sore feet, varicose veins, lower back compression, and plantar fasciitis. The value of a sit-stand desk is the ability to switch between the two throughout the day, not replace one extreme with another. Aim for no more than one to two hours of standing at a stretch before sitting back down.
If I can only change one thing today, what should it be?
Raise your monitor to eye level. It is the most common problem in home office setups and one of the easiest to fix today. A screen that sits too low pulls your head forward and down constantly, which compresses your neck and strains your upper back over time. Stack some books under it right now if that is all you have. Just get it up to eye level.


